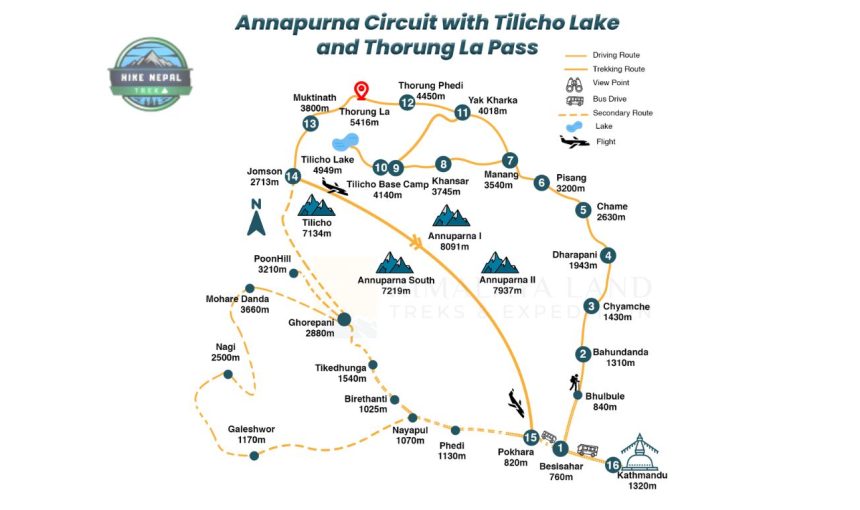
Why You Need an Updated Annapurna Circuit Trek Map
You need an updated Annapurna Circuit trek map because rapid motor road construction over the last decade has fundamentally altered the traditional footpaths, making older topographic maps obsolete and potentially dangerous. A modern, verified map is absolutely essential for your safety because it highlights the New Annapurna Trekking Trails (NATT), which allow you to completely bypass the dusty, high-traffic jeep roads, while accurately marking critical real-time trail realities like recent landslide reroutes, newly constructed suspension bridges, and precise village elevations. Relying on an outdated route plan means you risk getting stranded on active construction zones, miscalculating your daily altitude acclimatization schedule before the grueling 5,416-meter push over Thorong La Pass, or getting lost in areas where old trails have been completely wiped out by modern infrastructure development.
Table of Contents
The Reality of Modern Himalayan Navigation
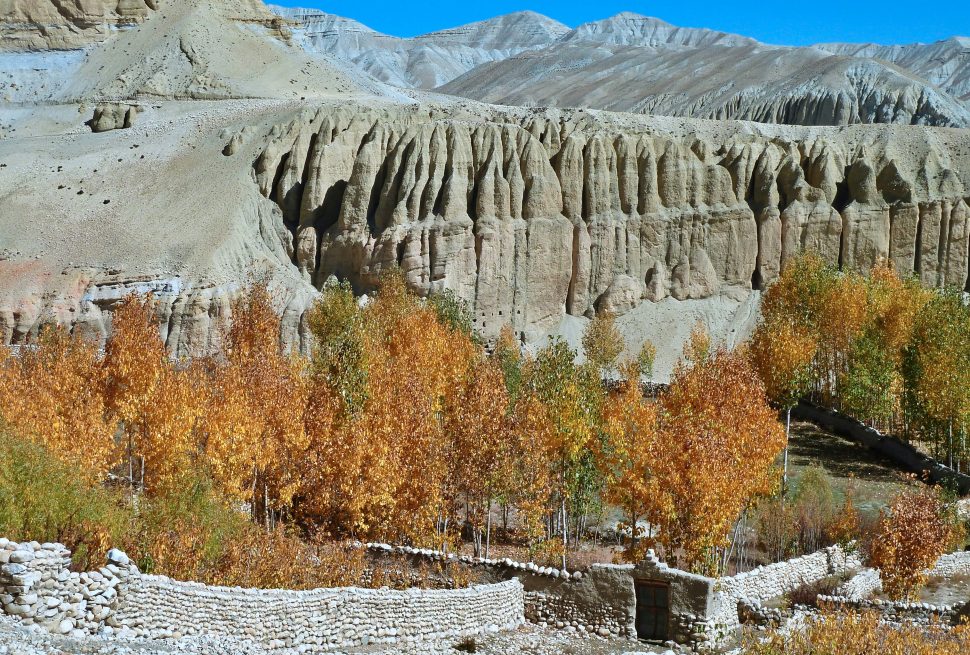
To truly understand the value of a modern Annapurna Circuit trek map, you have to look at how dramatically the geography of the Annapurna conservation area has evolved. Years ago, trekking the circuit meant a continuous, uninterrupted 3-week wilderness walk starting from the low sub-tropical valley of Bhulbhule or Besisahar. Today, the expansion of the motorable road network stretches deep into both sides of the circuit—reaching all the way up to Manang on the eastern side and descending past Muktinath through Jomsom on the western side.
If you attempt to navigate using a legacy map or a basic highway overview, you will inevitably find yourself walking on gravel roads alongside noisy, dust-billowing local jeeps and construction trucks, which completely ruins the serene mountain atmosphere you traveled to Nepal to experience.
An updated, high-quality Annapurna Circuit trek map acts as your shield against these infrastructure shifts. It explicitly charts the color-coded NATT paths (typically marked on the actual trail with red-and-white or blue-and-white stripes on rocks and trees), showing you exactly where to branch off the road into pristine pine forests, ancient stone villages, and isolated ridge lines.
Furthermore, high-altitude terrain is incredibly dynamic; seasonal monsoons and winter avalanches frequently cause shifts in the landscape. A newly updated map ensures that alternative bridges, emergency safe zones, and newly established teahouses are correctly positioned.
By investing your time in analyzing an accurate map before your journey, you can precisely plan your daily trekking segments, identify the best acclimatization hubs like Ngawal or Upper Pisang, and ensure that your physical energy is spent conquering the breathtaking Himalayan passes rather than navigating stressful, outdated road detours.
Traditional Route vs. Modern Road Network Intersections
To understand the Annapurna Circuit today, you have to look at how modern infrastructure has changed the original trail. The classic, traditional route was built entirely for foot travel, pack mules, and local communities moving between isolated mountain valleys. Today, however, motorable roads have been built deep into both sides of the mountain range, forever changing how we organize our itineraries.
Here is a simple, complete breakdown of how the old footpaths and the new roads intersect, and what it means for your journey.
The Eastern Side: Besisahar to Manang
In the past, the trek began immediately on foot from Besisahar. Trekkers spent five to seven days walking through lower, subtropical forests and deep river valleys just to reach the alpine zones.
- The Road Today: A dirt road now runs along the valley floor all the way from Besisahar past Chame, ending at the main hub of Manang (3,540 meters).
- The Impact: Walking on this main track means sharing a narrow space with local 4WD jeeps, trucks, and motorcycles, which kicks up immense clouds of dust during the peak spring and autumn seasons.
- The Solution: Most modern itineraries completely skip the dusty first few days by taking a private or shared jeep directly from Besisahar to Dharapani or Chame. From there, you begin walking on foot, stepping off the vehicle road entirely by using the high-altitude alternative trails via Ghyaru and Ngawal.
The Western Side: Muktinath to Jomsom and Pokhara
Once you cross the highest point of the trek at Thorong La Pass (5,416 meters), you descend into the holy temple grounds of Muktinath.
- The Road Today: On this side of the mountain, a fully established motor road runs from Muktinath down to Jomsom, and continues all the way south through Tatopani to Beni and Pokhara.
- The Impact: The traditional three-day knee-burning descent along the windy Kali Gandaki riverbed is now heavily dominated by vehicle traffic, local buses, and even adventure motorcyclists.
- The Solution: Rather than walking along a busy gravel highway, the vast majority of modern trekkers finish their walking journey at Jomsom. From here, you can choose to fly out on a short mountain flight directly to Pokhara or take a private ground vehicle transfer, completely skipping the dusty roads.
The Wilderness Core
Despite all the road expansion in the lower valleys, there is a massive section of the Annapurna Circuit that remains 100% untouched by modern roads.
Between the upper villages of Manang, through Yak Kharka, up to Thorong Phedi, over the high pass, and down to Muktinath, the high-alpine terrain is far too steep, rocky, and extreme for any vehicles. This core section is exactly the same wild, breathtaking mountain experience today as it was forty years ago. No engines, no horns—just prayer flags, yak caravans, and pristine footpaths.
Benefits vs. Downsides of the New Roads
| The Benefits | The Downsides |
| Saves Time: Shortens a 21-day trek down to a manageable 10 to 14 days by cutting out lower road walking. | Dust & Noise: Walking on the main roads causes respiratory irritation and interrupts mountain solitude. |
| Emergency Safety: Land-based medical evacuations and jeep rescues are now incredibly fast if you get injured. | Loss of Lowlands: You miss out on the initial low-altitude subtropical valley villages. |
| Cheaper Supplies: Better road access means teahouses can easily bring in fresh food and better lodge building materials. | Environmental Shifts: Increased vehicle emissions and roadside construction alter the natural landscape. |
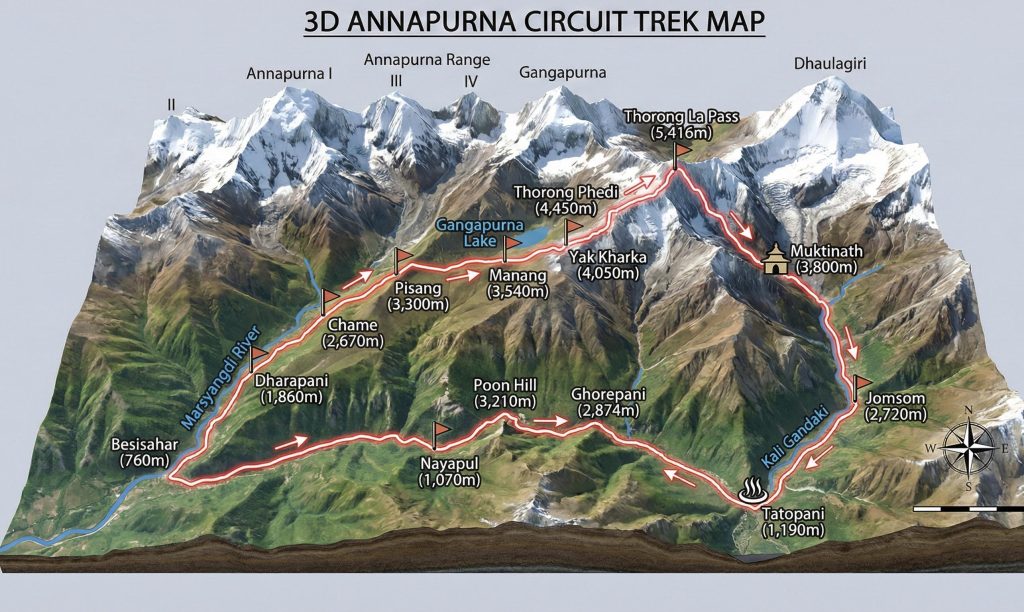
Section-by-Section Circuit Route Breakdown
Breaking down the Annapurna Circuit into distinct geographical stages helps you mentally and physically prepare for the changing landscapes and demands of the trail. The modern route transitions beautifully from dense, green valley forests into a thin-air alpine wilderness, before dropping down into a dramatic high-altitude desert.
Here is the exact day-by-day progression of the core trek, including realistic distances, timeframes, and shifting elevations.
Entering the Deep River Canyons
This initial stage introduces you to the rugged terrain of the Himalayas as you track the roaring Marsyangdi River. You will climb steadily through dramatic stone gorges, crossing spectacular suspension bridges wrapped in prayer flags.
- Day 1: Dharapani to Chame
- Distance: 15.5 kilometers
- Walking Time: 5 to 6 hours
- Nightly Altitude: 2,670 meters
- The Experience: You start your foot journey amid lush pine and rhododendron forests, catching your first incredible glimpses of Mount Manaslu and Lamjung Himal.
- Day 2: Chame to Upper Pisang
- Distance: 14 kilometers
- Walking Time: 5 hours
- Nightly Altitude: 3,300 meters
- The Experience: You hike beneath the massive, curved rock face of Paungda Danda—a sheer wall of smooth stone rising over 1,500 meters from the riverbed. Sleeping in Upper Pisang gives you a commanding panoramic view over the valley.
The High Valley Alpine Hub
As you enter the rain shadow of the mountains, the damp forests vanish, replaced by dry, open juniper slopes and ancient Tibetan-style villages built entirely of stone.
- Day 3: Upper Pisang to Manang (via the Upper Route)
- Distance: 15 kilometers
- Walking Time: 6 to 7 hours
- Nightly Altitude: 3,540 meters
- The Experience: Skip the flat road on the valley floor. Instead, climb up to the historic villages of Ghyaru and Ngawal. This high trail is physically demanding but offers the most jaw-dropping, eye-level views of Annapurna II, III, and IV found anywhere on the trek.
- Day 4: Mandatory Acclimatization Day in Manang
- Distance: Varies based on activity
- Walking Time: 2 to 5 hours (exploratory hikes)
- Nightly Altitude: 3,540 meters
- The Experience: To safely cross the high pass later, you must spend a second night here. Keep your body active by hiking up to the emerald-green Gangapurna Lake or visiting the local monasteries to trigger healthy red blood cell production.
Pushing into the Thin Air
The landscape shifts completely into a barren tundra of bare grey rock, loose shale, and freezing winds. Vegetation disappears, and your pace will slow down naturally as the oxygen levels drop.
- Day 5: Manang to Yak Kharka
- Distance: 10 kilometers
- Walking Time: 4 to 5 hours
- Nightly Altitude: 4,050 meters
- The Experience: A short, slow, and steady incline past high pastures where herds of long-haired Himalayan yaks graze. You cross the 4,000-meter threshold here, meaning steps must be taken deliberately to conserve energy.
- Day 6: Yak Kharka to Thorong Phedi
- Distance: 6 kilometers
- Walking Time: 3 to 4 hours
- Nightly Altitude: 4,525 meters
- The Experience: You trek along a narrow path carved into a steep scree slope to reach the base of the pass (Phedi). Rest early in your basic stone teahouse, as the upcoming morning requires an intense physical effort.
The Crux and the Sacred Descent
This is the defining day of your journey, challenging your endurance before delivering you into a completely different world on the opposite side of the mountain range.
- Day 7: Thorong Phedi over Thorong La Pass to Muktinath
- Distance: 16 kilometers
- Walking Time: 8 to 10 hours
- Maximum Altitude: 5,416 meters at the Pass summit (Ending at 3,800 meters)
- The Experience: You wake up around midnight or 3:00 AM to climb steep, snowy switchbacks under the stars, reaching the iconic prayer-flag-covered summit of the pass before the dangerous midday winds pick up. After celebrating, you face a long, knee-burning 1,600-meter descent into the arid landscape of Mustang, finishing at the sacred pilgrimage temples of Muktinath.
- Day 8: Muktinath to Jomsom
- Distance: 20 kilometers
- Walking Time: 5 to 6 hours
- Nightly Altitude: 2,720 meters
- The Experience: You walk through the otherworldly, wind-scoured terrain of the Kali Gandaki riverbed, passing through the ancient medieval gateway village of Kagbeni before concluding your foot trek at the market hub of Jomsom.
Table of Daily Itinerary
| Stage & Day | Trail Segment | Distance (km) | Hiking Duration | Overnight Elevation |
| Day 1 | Dharapani to Chame | 15.5 km | 5–6 Hours | 2,670 meters |
| Day 2 | Chame to Upper Pisang | 14 km | 5 Hours | 3,300 meters |
| Day 3 | Upper Pisang to Manang (High Trail) | 15 km | 6–7 Hours | 3,540 meters |
| Day 4 | Rest & Acclimatize in Manang | — | 2–4 Hours | 3,540 meters |
| Day 5 | Manang to Yak Kharka | 10 km | 4–5 Hours | 4,050 meters |
| Day 6 | Yak Kharka to Thorong Phedi | 6 km | 3–4 Hours | 4,525 meters |
| Day 7 | Phedi to Muktinath (via Thorong La) | 16 km | 8–10 Hours | 3,800 meters (Pass: 5,416m) |
| Day 8 | Muktinath to Jomsom | 20 km | 5–6 Hours | 2,720 meters |
Digital Navigation Tools vs. Himalayan Reality
When planning your journey along the Annapurna Circuit, it is easy to assume that your smartphone will handle all your mapping needs. While modern mobile applications are incredibly advanced, the extreme topography and unpredictable environment of the high Himalayas create a massive gap between a digital screen and the actual conditions on the ground.
Understanding the limitations of technology in the mountains is essential for keeping your journey seamless and safe.
The Glaring Limitations of Google Maps
Google Maps is a phenomenal tool for navigating urban cities, finding hotels in Pokhara, or mapping highways. However, you must never use Google Maps as your primary navigation tool on a Himalayan trek.
- The Problem: Google’s software is fundamentally optimized for vehicular traffic and city street grids. In the mountains, it lacks accurate topographic contour lines and hillshading data.
- The Danger: It completely fails to display pedestrian-only footpaths, steel suspension bridges, landslide bypasses, or seasonal river crossings. If you rely on it, the app will often default to vehicle paths, mistakenly directing you to walk straight down dangerous, heavily dusty jeep roads rather than the beautiful trekking trails running parallel to them.
The Best Dedicated Offline Mapping Apps
Because mobile data signals and Wi-Fi networks disappear almost completely once you push past Chame, you must download offline mapping applications before departing Kathmandu or Pokhara. Two specific platforms have become the gold standard for independent travelers and professional mountain guides:
- Mapy.cz (The Top Recommendation): This platform has revolutionized outdoor mountain tracking. Unlike basic maps, it clearly differentiates trail types using distinct visual lines (such as solid lines for wide tracks and dotted lines for narrow, rocky footpaths). It accurately integrates OpenStreetMap data with crisp elevation contours, making it exceptionally reliable for finding alternative trails away from jeep traffic.
- Maps.me (The Reliable Backup): A widely popular, user-friendly offline map that is excellent for tracking general village-to-village progress, locating teahouses, and estimating basic walking distances.
Important Setup Note: You must explicitly download the full offline map files for the “Western Nepal” and “Gandaki” regions while you still have high-speed Wi-Fi in the city. The app will not work if you try to load the maps mid-trek without a signal.
Why Your Phone Will Still Fail You: The Reality Check
Even with the best offline apps downloaded, a smartphone is still a fragile piece of electronics vulnerable to the harsh mountain climate.
- The Cold Battery Drain: High-altitude sub-zero temperatures (especially from Yak Kharka up to Thorong La Pass) cause the chemical reactions inside lithium-ion phone batteries to slow down drastically. A phone with 80% battery can drop to 0% and shut off completely within minutes of being exposed to the freezing mountain air.
- No Live Updates: A static, pre-downloaded GPX track cannot predict real-time mountain hazards. An offline map cannot warn you if a wooden footbridge was washed away by an afternoon flash flood, if a winter blizzard has completely buried the trail markings under three feet of snow, or if a fresh rockfall has temporarily closed a path.
The Ultimate Smart Navigation Protocol
To ensure you never find yourself lost or disoriented in the wilderness, always follow these three simple rules:
- Bring Analog Insurance: Always pack a physical, waterproof paper map of the Annapurna Circuit (such as the Himalayan Map House editions). Paper maps do not require batteries, never suffer from screen glare, and provide a vital macro-view of the entire valley geography.
- Pack a Heavy-Duty Power Bank: Keep your electronic devices and charging cords stored inside an insulated pocket close to your body heat (like your inner jacket pocket) to protect battery longevity.
- Trust Local Intelligence Over Data: Before you lace up your boots and leave your teahouse every single morning, ask the lodge owner or local checkpoint officers about the current trail conditions. Real-time human insight from local mountain experts will always be infinitely more accurate than any satellite algorithm.
Popular Trail Variations and Side Trek Extensions
The true magic of the Annapurna Circuit lies in its brilliant adaptability. It is not just a rigid, single-track conveyor belt to the pass; instead, it serves as a central spine from which some of the most dramatic, untouched, and visually stunning wilderness detours in the entire Himalayan chain branch out.
Adding an extension or side trek lets you leave the main crowds behind, experience authentic tribal cultures completely isolated from modern roads, and give your body exceptional physiological preparation for the thin air ahead.
If you want to transform a standard loop into an unforgettable, deep-mountain journey, here are the major trail variations and hidden extensions you can integrate into your itinerary.

1. The Tilicho Lake Detour
This is the most sought-after and strategically valuable addition to the circuit. Rather than moving directly north toward Yak Kharka from the Manang valley, you branch southwest into a raw, canyon-carved landscape dominated by massive scree slopes and crumbling cliffs.
- The Route Structure: Manang Village < Siri Kharka < Tilicho Base Camp < Tilicho Lake Summit < Retrace to Siri Kharka < Cross-cut directly to Yak Kharka (bypassing Manang on the return).
- Time Investment: Adds 2 to 3 days to your master itinerary.
- Altitude Apex: 4,949 meters at the lake’s edge.
- The Insider Reality: Tilicho Lake is a massive, deep-turquoise glacial sheet nestled directly under the daunting, vertical snow fortress of the Tilicho Peak Great Barrier (7,134 meters). The trail from Siri Kharka to Base Camp crosses active landslide zones where the path is carved into steep, shifting gravel slopes. It requires absolute focus, steady footing, and early morning crossings to avoid afternoon wind-triggered rockfalls.
- The Acclimatization Superweapon: Pushing your body up to nearly 5,000 meters and returning to sleep at Siri Kharka (4,060 meters) acts as a perfect training run for your red blood cells. When you return to the main route, your risk of experiencing Acute Mountain Sickness (AMS) at Thorong La Pass drops drastically.
2. The Nar Phu Valley Extension (The Restricted “Little Tibet”)
For trekkers seeking an off-the-beaten-path cultural immersion that feels like traveling centuries back into the past, this restricted valley detour is unmatched. The path breaks away from the main circuit early on at the river junction village of Koto, located just before you reach Chame.
- The Route Structure: Koto Checkpoint < Meta Village < Phu Gaon (The ancient fortress village) < Nar Village < Kang La Pass < Descend directly into the circuit at Ngawal.
- Time Investment: Adds 6 to 7 days of strenuous wilderness trekking.
- Altitude Apex: 5,322 meters at the summit of Kang La Pass.
- The Insider Reality: Hidden behind deep, narrow river chasms, the twin valleys of Nar and Phu were completely closed to foreigners until 2003 and remain strictly regulated. Phu Gaon is a medieval stone citadel where time has completely stood still, and locals maintain a semi-nomadic Tibetan Buddhist lifestyle. The landscape here is stark, dry, and wildly spacious, offering a high chance of spotting blue sheep or the elusive Himalayan snow leopard.
- The Ultimate Challenge: Rejoining the main circuit requires conquering the grueling Kang La Pass. The ascent is steep, but crossing it rewards you with an unmatched perspective of the Annapurna Massif from the north.
- Logistics Note: Because it is a protected border zone, solo trekking is illegal. You must secure a specialized Restricted Area Permit through a registered agency and hire an authorized local guide.
3. The Ice Lake (Kicho Tal) Day Hike (The Ultimate Manang Rest-Day Substitute)
Most travelers spend their mandatory acclimatization day in Manang taking a short, easy walk to Gangapurna Lake. If you are physically fit and want a far more rewarding, uncrowded challenge, swap it for the intense day hike to Ice Lake.
- The Route Structure: Out-and-back trek starting from either Bhraka (Braga) village or Manang < Steep north-facing ridge climb < Kicho Tal < Return via the same trail.
- Time Investment: A full, demanding 6 to 7-hour round-trip day hike.
- Altitude Apex: 4,620 meters at the upper lake basin.
- The Insider Reality: This is a relentless, vertical uphill staircase that tests your lungs and legs. Because it climbs the north ridge of the valley wall, you are entirely turned away from the shade, meaning you need plenty of sunscreen and water. The payoff at the top is a pair of pristine, high-altitude alpine lakes that remain frozen late into the spring.
- The View: Standing at Ice Lake gives you an unobstructed view looking straight across the valley at the entire Annapurna range, Chulu East, and Pisang Peak, completely free of the valley floor haze.
4. The Lupra Valley Trail (The Hidden Cultural Bypass below Muktinath)
Once you cross Thorong La Pass and drop down to Muktinath, the standard route guides you down a wide, dusty vehicle road toward Kagbeni or Jomsom. This alternative trail lets you escape the engines completely.
- The Route Structure: Muktinath < Cross the southern ridge over the Lupra Pass (3,800m) < Descend into the Panda Khola gorge < Lupra Village < Jomsom.
- Time Investment: No extra days needed; it simply replaces the standard walking route to Jomsom.
- The Insider Reality: Lupra is one of the very last remaining pockets of the ancient, pre-Buddhist Bon-Po religion in the Annapurna region. Tucked away inside a deep, wind-sheltered river canyon, this traditional stone village sees a fraction of the tourists that visit neighboring Kagbeni. You can visit the local Bon monastery, walk along a dry, dramatic riverbed filled with fossils (shaligrams), and walk directly into Jomsom completely insulated from the heavy jeep and bus traffic on the main highway.
Comprehensive Comparison of Trail Extensions
| Variation / Extension | Difficulty Level | Peak Elevation | Main Highlight | Best Suited For |
| Tilicho Lake Detour | Strenuous / Exposed | 4,949 meters | Deep-blue glacial lake under a 7,000m mountain wall. | Trekkers looking for premium altitude safety prep. |
| Nar Phu Valley | Extreme / Remote | 5,322 meters (Kang La) | Untouched medieval Tibetan stone culture and deep wilderness. | Experienced hikers seeking an off-the-beaten-path adventure. |
| Ice Lake (Kicho Tal) | Demanding (Day Hike) | 4,620 meters | Panoramic views of the Annapurna Massif from a high mountain basin. | Fit trekkers wanting an active, challenging rest day. |
| Lupra Valley Bypass | Moderate | 3,800 meters | Ancient Bon-Po religious heritage; 100% vehicle-free path to Jomsom. | Cultural enthusiasts looking to avoid the dusty main road. |
The Annapurna Circuit is one of the most geographically diverse long-distance treks in the world. Because of modern road networks in the lower valleys, the overall trail metrics are highly adaptable. Depending on whether you choose the full classic loop or opt for a modern jeep-assisted start, the total walking distance ranges from 110 kilometers to 230 kilometers.
The elevation profile presents a classic horseshoe arc: beginning in lush subtropical river valleys, peaking at an alpine mountain pass, and dropping into the rain-shadow desert of the Mustang region.
Here is a detailed, original breakdown of the core elevation and distance metrics that define this iconic route.
Core Distance & Elevation Milestones
The physical journey spans across drastically different ecological zones, requiring strategic pacing to allow the human body to adapt to the thin air.
- Total Walking Distance (Standard Route): Approximately 130 to 160 kilometers (when skipping the lower dusty roads by starting the trek from Dharapani and concluding in Jomsom).
- Total Walking Distance (Classic Full Loop): Up to 210 to 230 kilometers if walking from Besisahar all the way through Tatopani and Ghorepani.
- Starting Elevation: 760 meters (Besisahar) or 1,860 meters (Dharapani).
- Maximum Elevation: 5,416 meters at the summit of Thorong La Pass.
- Average Daily Hiking Distance: 10 to 17 kilometers per day.
- Average Daily Walking Time: 4 to 7 hours (extending to 8 to 10 hours on the pass-crossing day).
Sector-by-Sector Metrics
To understand the daily physical impact of the terrain, the trek can be divided into three distinct geographic phases.
1. The Marshyangdi River Ascent (The Climb)
This phase takes you through deep gorges, pine forests, and dramatic cliffs. The elevation gain is steady, helping you build initial stamina.
| Trail Segment | Distance (Approx.) | Starting Elevation | Ending Elevation | Net Elevation Change |
| Dharapani to Chame | 15.5 km | 1,860 m | 2,670 m | +810 m |
| Chame to Upper Pisang | 14 km | 2,670 m | 3,300 m | +630 m |
| Upper Pisang to Manang (via Upper Ngawal Route) | 17 km | 3,300 m | 3,540 m | +240 m (with sharp intermediate gains up to 3,660m) |
Acclimatization Milestone: Manang (3,540m) is the crucial operational hub of the circuit. Trekkers spend an extra day here to acclimatize. Optional side hikes—such as the grueling climb to Ice Lake (4,600m) or a shorter walk to Gangapurna Lake viewpoint—are used to trigger red blood cell production without moving your sleeping altitude higher.
2. The High-Altitude Alpine Approach
Above Manang, the terrain transitions into alpine shrub and barren rock. The daily distances drop significantly, but the thin air makes every kilometer feel twice as long. Trekkers must ascend slowly to prevent Acute Mountain Sickness (AMS).
| Trail Segment | Distance (Approx.) | Starting Elevation | Ending Elevation | Net Elevation Change |
| Manang to Yak Kharka | 10 km | 3,540 m | 4,050 m | +510 m |
| Yak Kharka to Thorong Phedi | 6 km | 4,050 m | 4,540 m | +490 m |
| Thorong Phedi to High Camp (Optional push) | 1 km | 4,540 m | 4,925 m | +385 m (Extremely steep switchbacks) |
3. The Thorong La Pass Crossing & Descent
This is the ultimate test of endurance. It features a demanding, pre-dawn uphill climb followed by a massive, knee-jarring descent into the Mustang district.
- Segment: Thorong Phedi/High Camp to Muktinath (via Thorong La Pass)
- Distance: 15 to 16 kilometers
- Maximum Elevation Point: 5,416 meters
- Ending Elevation (Muktinath): 3,760 meters
- Elevation Gain on Summit Push: +876 meters (from Phedi) or +491 meters (from High Camp)
- Elevation Loss on Descent: -1,656 meters (A continuous, steep descent on loose scree to the sacred temple valley of Muktinath).
Popular Side-Trip Metrics
For an immersive mountain experience, many itineraries incorporate detours that add physical challenge and stunning alpine vistas.
- Tilicho Lake Detour: Branching off from Manang/Siri Kharka, this side trip adds approximately 20 to 25 kilometers to the total journey. It takes you to one of the highest lakes in the world, situated at 4,919 meters, requiring an additional 2 to 3 days of high-altitude trekking before rejoining the main circuit at Yak Kharka.
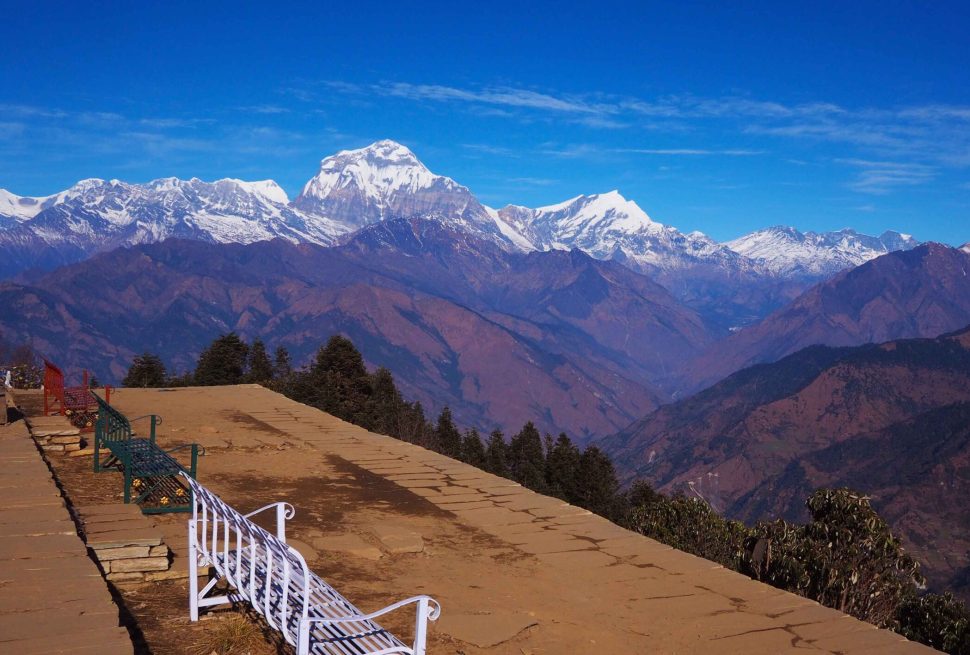
- Poon Hill Extension: Located at the tail end of the classic loop, climbing from Ghorepani (2,870 meters) up to the Poon Hill viewpoint at 3,210 meters adds a sharp morning ascent of 340 vertical meters along stone stairs, providing a panoramic view of both the Dhaulagiri and Annapurna massifs.
Understanding these precise metrics is vital for logistical planning, pack weight management, and calculating the exact physical preparation required to safely complete the circuit.
Real-Time Mountain Safety and Route Verification
No matter how pristine your physical map is or how advanced your offline navigation application may be, navigating the high alpine environment of the Himalayas safely requires acknowledging that the mountains are dynamic, constantly shifting, and strictly regulated. High-altitude safety means combining careful self-awareness with real-time on-the-ground intelligence and absolute regulatory compliance.
To ensure your journey remains secure, predictable, and free from administrative or physical complications, you must follow these essential safety and route verification protocols.
Strict Compliance with Current Trekking Regulations
The regulatory framework for mountain tourism ensures tracker safety and efficient emergency management.
- The Mandatory Guide Mandate: Trekkers across all major protected sanctuaries—including the full Annapurna Circuit—must be accompanied by a government-licensed mountain guide employed through an officially registered Nepalese trekking agency. Independent or solo trekking without a licensed professional is illegal. Attempting to enter the trail without a verified guide leads to immediate financial fines, permit revocation, and being escorted back to the nearest roadhead by checkpoint authorities.
- Permit Verification Loops: Your printed Annapurna Conservation Area Permit (ACAP) and digital E-TIMS registration are verified manually at several mandatory police and park checkpoints along the route (such as Dharapani, Chame, and Jomsom). You must carry multiple physical hard copies of your documentation, as digital screenshots are frequently rejected by checkpoint officers due to limited or non-existent power and cellular connectivity in remote mountain stations.
Managing the Weather Crucible at Thorong La Pass
The high-altitude crossing from Thorong Phedi over Thorong La Pass 5,416 meters to Muktinath is the most meteorologically volatile segment of the entire circuit.
- The Midnight Push Rule: You must begin the summit push between 3:00 AM and 5:00 AM. This early departure ensures you clear the highest crest of the pass before the sun heats the atmosphere, which triggers ferocious, freezing midday gale-force winds and whiteout blizzards that sweep across the exposed ridge lines.
- The Seasonal Shutdown Reality: Even during the peak trekking windows of spring and autumn, sudden trans-Himalayan weather systems can dump feet of snow on the pass within hours. Never assume the trail is open just because it was clear the day before. Your guide must verify trail viability and snow depth with local teahouse operators at Phedi or High Camp before you begin climbing in the dark. If the pass is blocked by heavy snow or avalanche risks, you must wait out the storm at a lower elevation—no exceptions.
The Acclimatization and Early Descent Protocol
Altitude sickness does not correlate with physical fitness, age, or training. It is a purely physiological reaction to the drop in barometric pressure, making early detection vital.
- The Clinical Rule of Descent: Your licensed guide is trained to monitor you for the primary indicators of Acute Mountain Sickness (AMS), such as splitting headaches, loss of physical coordination, nausea, and persistent dizziness. If these symptoms escalate into a hacking cough or severe disorientation, the only cure is immediate horizontal descent to a lower altitude. Never attempt to “push through” a worsening headache just to reach the pass.
- Emergency Heli-Evacuation Insurance: Before your tracking permits can be legally issued, you must provide verified proof of travel insurance that explicitly covers high-altitude mountain trekking and specialized helicopter search and rescue operations up to 6,000 meters. In the event of severe high-altitude medical emergencies, like HAPE or HACE, your guide will utilize satellite communication to coordinate a helicopter evacuation directly to a hospital in Kathmandu.
Daily Route Verification
| Timeline | Action Required | Safety Objective |
| Pre-Trip Prep | Secure comprehensive insurance up to 6,000 m and print physical permit copies. | Ensures legal entry through trail gates and guarantees medical flight coverage. |
| Every Morning | Cross-reference offline digital maps with real-time updates from your guide and teahouse owners. | Identifies fresh landslide detours, missing bridges, or active trail maintenance zones. |
| Above 3,000 meters | Limit net nightly sleeping gains to 400–500 meters and maintain active recovery pacing. | Prevents high-altitude sickness and builds cardiovascular stamina naturally. |
| The Pass Crossing | Clear the 5,416 m summit before 10:00 AM; turn around immediately if severe weather rolls in. | Avoids dangerous freezing afternoon winds and unexpected alpine blizzards. |
For Booking Details https://hikenepaltrek.com/destinations/nepal/annapurna-region/